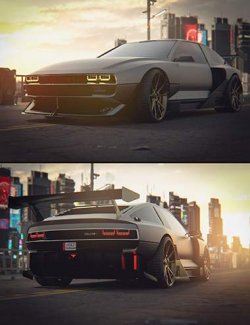
In the post apocalyptic world, nothing is sacred. The play things of twentieth century billionaires are now put to work defending the waste land.
Adapted from a 1970's rally car, the Strafos Scout is quick and nimble; the ideal tool for searching out enemies and directing a preemptive strike...
Included:
1 Strafos Scout Vehicle Model
1 Adjustment morph to mimic body panel damage
4 Character Driving Seat Poses (one each for G3F, G3M, G8F, G8M)
6 Adjustment sliders to control position of various features such as wheels
11 Material presets (iray only) for different colours, dust effects and lighting
3 Surface groups for turning details on/off to improve render time/memory (see usage notes below for how to use)
Usage Notes:
Colour & Materials
- Lights can be turned on and off using the preset in the Iray\Materials folder.
- Dust can be turned on and off using the preset in the Iray\Materials folder.
- With 'Dust On', increasing the Metalicity in the 'Rims' Surface Slot will allow more of the Rim colour to show through.
- Wheels & Bodyshell colours can be changed using the various presets.
TIP: After applying the 'Stealth Black' Colour scheme, the Diffuse > Base Colour can be adjusted in each of the following Surface Slots - Door_Rusty, Hood_Rusty & Tub_Rusty. This allows for endless colour combinations of bodywork.
Details High/Low
- The Strafos Scout has been optimised as a SubD model however some of the details can be still be turned off as req'd when using as a background prop only. In the Daz Studio Scene tab, Strafos Scout > Hide_Show > ... toggle the 'bones' on-off for the various elements.
- The Hood and Front End trim can also be turned off using this method for a 'rat-rod' look.
Prop Rigging & Morphs
- Door can be opened, wheels & steering can be turned.
- Speedometer and Rev Counter Needles can be moved.
- A subtle Dings and Dents Morph slider can be found under the General sub-set of the Strafos Scout Figure.
Genesis 3 & 8 Character Poses
- With Character Selected, apply the appropriate Pose from the Poses folder.
- The poses are developed for the Base Genesis 3 & 8 figures that come included with Daz Studio.
- Some adjustment will be required to enable others to fit properly.
- Once posed and adjusted then create and group with the vehicle and the character so that they all move together.
- If you need to adjust the pose to suit the character you are using then save your modified pose as a 'Pose Preset' so you can come back to it later if required.
TIP: To Fix any poke-through of Character hair with the vehicle roof, the best option is to hide the unwanted polygons of the hair mesh using the Geometry Editor Tool. This is not as tricky as it sounds and feel free to message me if you need help with that (there are also many YouTube videos explaining the process).
I hope you have as much fun creating renders with this model as I had making it!
Software:
Daz Studio 4