This product is compatible with DAZ Studio versions 4.21 through 4.24 and works with Genesis 8/8.1 Female(s) and Genesis 9.
This product is a free update for existing owners of Torn Stockings for Genesis 9. It is not a standalone product—you must have Torn Stockings for Genesis 9 installed for this update to work.
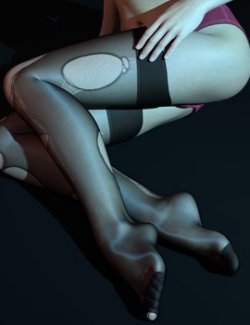
After installing this update, the torn stockings can behave more elastically. The stocking cuffs will create noticeable indentation deformation on the character's thighs, and the fibers around the tears can apply slight pressure to the character's skin, adding more detailed variation to your renders.
Installation Guide:
Copy the "data" and "People" folders from this update into your DAZ Studio library directory where Torn Stockings for Genesis 9 is installed. Overwrite existing files when prompted.
After installation, you will see:
1. A new subfolder named "07 Dig into the Skin" under "People > Genesis 9 > Clothing > Raze-M > Torn Stockings" in the Content Library panel, containing 4 new scripts.
2. Some icons in the "06 Runs and Holes > Left Leg" and "06 Runs and Holes > Right Leg" folders will now display a tightening icon in the lower-right corner.
*******
Usage Guide:
1. Apply the torn stockings to your character as usual. Then, select the character or a torn stockings node in the Scene panel.
2. Double-click "Torn Stockings G9 - Dig into the Skin 01 - Cuff On" in the "07 Dig into the Skin" folder. You will see the character's thighs deform due to the pressure from the stocking cuffs.
3. Double-click "Torn Stockings G9 - Dig into the Skin 02 - Cuff Off" to release the cuff's pressure on the thighs.
4. If you have already applied Runs and Holes presets to the stockings, double-click "Torn Stockings G9 - Dig into the Skin 03 - Hole On" to make the fibers around the tears press against the character's skin.
5. Double-click "Torn Stockings G9 - Dig into the Skin 04 - Hole Off" to stop the fibers from pressing against the skin.
Note:
1. If you modify the tear patterns using a new Runs and Holes preset, run "Torn Stockings G9 - Dig into the Skin 03 - Hole On" again to update the skin deformation accordingly.
2. "Torn Stockings G9 - Dig into the Skin 03 - Hole On" only works with Runs and Holes presets that have the tightening icon. Presets without the icon have tears that are too small to affect the skin.
3. Among the presets with the tightening icon, only those located in "fleshy" areas (such as the thighs or the back of the calves) and with sufficiently large tears will produce visible skin deformation.
4. Skin deformation caused by the tears may not be very pronounced. You may need to adjust the camera to a specific angle to observe it clearly.
5. "Torn Stockings G9 - Dig into the Skin 01 - Cuff On" and "Torn Stockings G9 - Dig into the Skin 03 - Hole On" may cause poke-through issues, especially when used together. If this occurs, select the torn stockings node, go to the Parameters panel, find "Mesh Smoothing" under "General", and set "Enable Smoothing" to On. You can also use the Anti Poke-Through morphs of the torn stockings node to finally eliminate these poke-through issues.