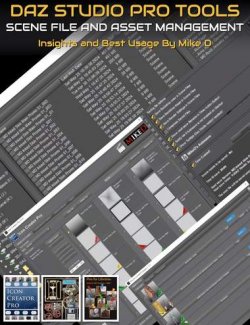
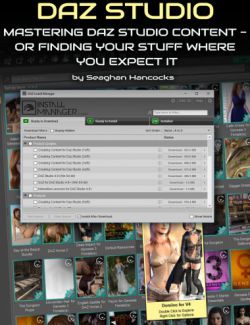
Daz Studio’s ‘Smart Content’ pane is not only an efficient method of working, but allowing you to see, at a glace, what product you have, and what figures it supports. No longer do you need to remember where an asset is loaded, the Smart Content pane handles that for you creating an “on-the-fly” catalogue of loaded assets, depending on what figure you have selected in your scene.
Sooner or later, you will want to add product to Daz Studio that is either older product, or a non-Daz product and it’s frustrating not to have all your content appearing in the Smart Content pane, and this tutorial will show you how to add the information to the database and metadata, step by step.
We start with a simple pair of non-Daz boots. Just the model and six materials. Each step is clearly explained and demonstrated and once complete, works flawlessly in the Smart Content pane with all the files attributes properly tagged.
Next, we move on to a slightly more complex model, a Daz product with both Poser and Daz materials
Using the same techniques as demonstrated on the boots, we show how to categorize the different materials as well as information cards to the Smart Content pane.
We also cover the dreaded “Lost and Found” folder. What it is? Why content ends up there? How to prevent content from going there and what to do when content is already there.
Carrying the discussion a little further, we offer a bonus video referenced in the tutorial demonstrating how to add a very complex model, with multiple geometry, oodles of materials as well as scripts and visibility changes. What better example to chose than Arki’s Sylph Dress. This model has multiple pieces, some are dynamic, along with fitting help and so may materials, we lost track.
All the Tutorials are Closed Captioned in English as well as indexed so that the user can easily jump from topic to topic as they work their way through the processes and are provided with a PDF file with time code for reference and an abbreviated procedural list of what you need to do so you don’t have to keep referencing the video.
The written steps in the document correspond to the indexed steps in the video so if you’re having a problem wish a particular step, it’s easy for you to immediately jump to that point in the video, regardless of which video you’re viewing. Both the purchased tutorial and the bonus material are indexed this way.
Here’s a teaser to give you an idea of what's covered:
What's Included and Features
- Smartening Up the Daz Studio Database (total running time: 1 hour and 18 minutes)
- Intro
- What is the Smart Content pane
- My Content Library Folder structure for this Tutorial
- Demonstration of Loading a non-Smart Content product, Bootz by Rhiannon
- Step 1: Categorize every file
- Step 2: Create a Product Database entry
- Step 3: Load all the Geometry into the scene
- Step 4: Edit the Scene ID from the Scene pane
- Step 5: Select the product in the Product folder and start the Content DB Editor – Product tab
- Details of the Product pane
- Step 6: Content DB Editor – Asset tab
- Assigning File “Types”
- Audience – May be ignored
- Ensure that “Sync Product and Local Database” is checked
- Adding “User Tags”
- Description and Userwords tabs
- “User Notes” tab
- “Compatibility” tab
- Step 7: Select all Geometry in the Scene tab and then hit “Accept”
- Step 8: Move product from the temporary folder to the ‘Live’ content folder
- Step 9: Create a thumbnail for your product
- Demonstration of loading a DAZ product, High Boots for V4 by dx30
- Added a “fake” information card for the purposes of this tutorial
- Step 1: Categorize the files
- “Info” cards should be Categorized as Documents
- A deliberate miss of one of the files, to demonstrate Lost and Found folder
- Missing Metadata = Lost and Found folder
- Step 2: Create a Product
- Tips for Categorizing
- Tips for Creating a Product so you don’t miss any files
- Step 3: Load all the Geometry into the Scene
- Step 4: Edit the Scene ID from the Scene pane
- Step 5: Select all the Geometry in the Scene pane, select the product in the Product folder and start the Content DB Editor
- Filling in the Product tab in the DB Editor
- Add All the Files to the “files” pane from the top level folder to be sure not to miss any
- Step 6: Asset tab (sorting the files for ease of adding data to them)
- Step 7: Ensure all the Geometry is selected in the Scene pane and hit “Accept” to write the data
- Demonstration that there is still nothing in the Lost and Found folder
- Step 8: Move the product to your ‘Live’ content folder
- Step 9: Adding the thumbnail to the Product
- Reimporting Metadata
- Now there is a file in the Lost and Found folder!
- Fixing a file that is appearing in Lost and Found
- Neat Trick: Copying Categories
- User only: Creating a User Category in the default listing
- How to create a User Category in the default listing
- Files to Backup DON’T FORGET!
- Uninstalling/Reinstalling Content Demonstration
- Exporting Product Metadata
- Uninstalling/Reinstalling in a Completely different directory – in this case, my live, DS content folder
- Best Practices for Content Creators when Categorizing Content
- Magenta Colored Tags and how to best handle them
- The Readme Wiki from the Smart Content pane
- The Non-Daz Content Product Script
- Demonstration of the Smart Content pane in action
- All files MUST have ALL metadata attached to them to avoid the Lost and Found folder
- Bonus Content Coupon Code
- Credits and Links
- Smartening Up the Daz Studio Database – BONUS CONTENT (download from Meshology.guru using the coupon code at the end of the purchased video. Total Running Time 40 minutes).
- Intro
- Adding Arki’s Sylph Dress to the Database
- Step 1: Categorize the Files
- Categorizing Utilities
- Step 2: Create a Product from the Top Folder
- Step 3: Loading all the Geometry into the Scene
- Step 4: Edit the Scene ID’s
- Step 5: Starting the Content DB Editor > Product tab
- Step 6: Content DB Editor > Asset tab
- Step 7: Ensure all the Geometry is selected in the Scene pane and select Accept to write the info
- Creating User Categories
- Step 8: Moving the Product to the ‘Live’ Folder
- Step 9: Adding a Product Thumbnail
- Changing the User Notes
- Credits
- Both tutorials are fully edited and indexed for random access.
- Both tutorials include a PDF index with time code references for the user’s own notes.
Notes
- This product includes:
- 1 General Installer
Compatible Figures:
N/A
Compatible Software:
Install Types:
Install Manager Manual Install