Have you ever rendered a scene in Daz Studio and wondered where the light's coming from? How to control it? How to make it brighter, darker, moody, sultry, or action-packed? Of course, you have. That's the reason most of us are creating digital artwork!
Once we have the pose right, the scene set, and the characters in place, clothed, makeup applied, hair coiffed just so, with a sultry expression, it's time to bring the scene to life, and you can't do that without light and — a key ingredient in John's technique — shadows. Light focuses our attention on the key shapes in a scene, and shadows give definition and depth. Without good lighting, your renders will be flat and unappealing.
Working exclusively with the Iray Render Engine, we use real-world lighting techniques. In terms of terminology and the types of lights we put into our scenes, we use softboxes, reflectors, color temperature, high-key, low-key, studio portraiture, bodyscaping, Rembrandt lighting, using a mirror as a backdrop, god rays, and haze. We know what the rules are and when to break them. John expertly takes you through examples of these kinds of lighting and more. John creates the renders using only Daz Studio and freely downloadable lighting resources (such as HDRI files). You won’t need to use third-party software like Photoshop.
Did you know that there are 2 separate f-stop parameters in different parts of the Daz Studio interface, one that controls the depth of field and one that controls scene brightness? John clearly explains these and the other parts of Daz Studio that make lighting confusing, highlighting the key parameters that actually make a big difference to a scene.
Painting with light is an artistic skill that the movie industry has long recognized as key to creating mood and feeling. Understanding the settings and how and when to use them will help you to create more photorealistic renders without the frustration of adding light after light to a scene without knowing in advance what they will actually achieve. After getting to grips with digital lighting mechanisms and the relevant Daz controls, John describes several rules that help you avoid common lighting errors, such as boring ‘flat’ light and shadows that go in impossible directions. Crucially, John explains when to break the rules and shows how lighting techniques that look terrible in some scenes can make others pop with energy.
Note: Although this product is available by single episodes, we highly recommend purchasing the bundle because each episode builds on information from the previous and, for time considerations, is not repeated in every episode.
Bonus for Bundle purchasers: We have included the custom IES Profiles that are demonstrated in Episodes 4 and 5.
All in all, there are over 8 hours of content that will leave no question in your mind about how to light whatever scene you have in your imagination.
Each episode is professionally edited, sound balanced, and closed-captioned for ease of search and all include a PDF index of key points for ease of reference.
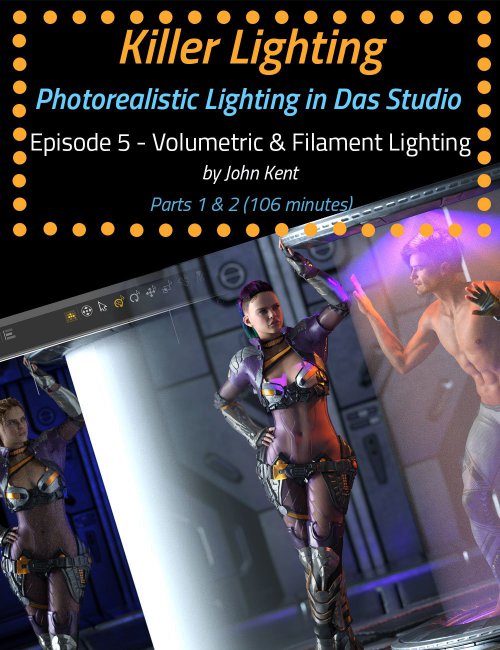
Part 5 - Atmospheric/Volumetric Lighting (1 hour and 43 minutes)
This tutorial focuses on atmospheric and volumetric lighting — in other words, lighting using interference in the air. John demonstrates that in 3 simple, easy-to-follow steps, you can add the eternal 'God Rays' to any scene you wish.
We start with a sunset, perhaps in southern Italy, and adjust the density of the air to simulate the dust that would be in the air. But we don't stop there.
Atmospherics have so many more uses, so how about combining IES Profiles with a smaller object, an object actually IN the scene to create the illusion of a force field?
The sun streaming through a window into a dusty church illuminates a knight, pondering her quest. These are light painting tricks that the movie industry has been using since they discovered that smoke made the lighting look better — all lighting — so why wouldn't we take advantage of the same trick in digital art?
We even show you how to create a laser effect — another first!
About the Presenter - John Kent
I'm a self-taught digital artist with a background in software tools and professional photography. These 2 worlds came together when I discovered 3D composition and rendering environments. With these tools, I can exploit light, shape, and texture to build scenes that would be almost impossible for me to stage using real-world photography, rapidly iterating from initial visual sketches to compelling photorealistic art. I also enjoy teaching and mentoring others, so I'm glad to work with Meshology to help other artists develop and render their own digital visions.
Watch our Teaser!
What's Included and Features
- Atmospheric and Volumetric Lighting (two parts)
- Part 1: 59 minutes (.MP4)
- 00:00:00 Intro
- 00:01:09 Overview of this Episode
- 00:02:46 Out of the Pool
- 00:03:57 Draw Dome turned on
- 00:05:19 Using Filament Draw style to position the HDRI
- 00:07:54 Using the Distant Light as a Fill Light
- 00:11:52 Cheating a Fill Light
- 00:14:12 Reducing the Beam Exponent
- 00:15:04 Making the additional Light believable
- 00:16:51 Adding details for Realism
- 00:17:08 Controlling the DoF
- 00:18:11 Creating a Sunset with Daz Studio's Sun only
- 00:19:01 Sun and Sky Only Mode
- 00:22:51 Sun and Sky Haze
- 00:24:19 Tinting the Light
- 00:24:36 Changing the Horizon Line
- 00:25:07 Changing the Saturation Tint
- 00:25:26 The Problem with the Sun and Sky Mode
- 00:28:16 Preparing for Battle - 'God Rays'
- 00:29:38 Scene Only Lighting
- 00:30:24 Creating a Spotlight 'outside'
- 00:32:49 Adding a Cube to the Scene
- 00:33:35 Changing the Cube's Settings
- 00:35:24 Scattering the Light
- 00:37:03 Recap
- 00:37:35 The Effects of changing the SSS Amount
- 00:38:23 Setting the Measurement Distance
- 00:40:34 Critiquing the Image
- 00:41:18 Creating a Distant Light
- 00:43:31 Be careful with the volume of your cube
- 00:48:12 Adding Light on your subject
- 00:50:40 Cheating is okay, within reason
- 00:51:50 Daz Studio default Grey Color for the Sky Dome
- 00:52:26 Changing the Viewport Background Color (Note, this is a global setting)
- 00:54:41 Adding a Moon
- 00:56:14 Changing the Emissive Parameters
- 00:58:49 Products used in the production of this tutorial
- Part 2: 47 minutes (.MP4)
- 00:00:00 Intro
- 00:01:03 Constraining Volumetric Lighting
- 00:01:30 Volumetric and Dome Lighting
- 00:02:14 Changing the default HDRI Light
- 00:03:01 Using Filament Draw Mode to Orient the Dome
- 00:04:43 Adding the Volumetric Lights
- 00:06:09 Changing the Refraction values
- 00:08:29 Opacity Maps in a Volumetric
- 00:10:14 Shaping the Light with IES Profiles
- 00:15:44 Adding Emissive Lighting to the Set
- 00:19:46 Creating a volumetric Cube
- 00:21:19 Changing the Refraction
- 00:22:17 Adding a Spotlight
- 00:23:43 Preventing the volumetric box from intersecting the floor
- 00:24:21 Fixing the Backdrop
- 00:28:42 Creating a plane
- 00:29:41 Adding and opacity Map
- 00:31:46 Summary of the steps
- 00:35:21 Preventing backscatter of light
- 00:36:17 Adding another Laser
- 00:40:52 Adding a 3rd Laser
- 00:46:16 Products used in the production of this tutorial
- Documentation: (.PDF)
- Killer Lighting Episode 5 Index
Compatible Software:
Daz Studio 4.15
Install Types:
DazCentral, DIM, Manual Install
