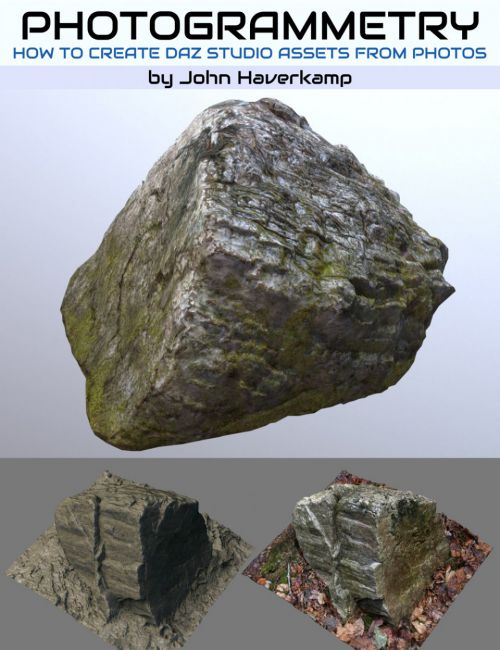
Photogrammetry is the method of making measurements from photographs where you can gain enough information to create a 3D object. With the right tools and workflow, you can create 3D models just from photographic references!
John Haverkamp leads you through a high value tutorial from taking good photos, to creating a mesh, editing in ZBrush and importing the model ready for use in Daz Studio.
In this case study he utilizes multiple photographs of a forest floor rock, complete with its detailed texturing. John turns this into a Daz Studio 3D asset, using Meshroom and ZBrush.
You'll need for this tutorial:-
- Meshroom (free and open source software)
- ZBrush
- Daz Studio
- Substance Designer and Painter (optional)
Tutorial Content
- Taking good photos ready for photogrammetry
- Meshroom – setting up the output correctly for ZBrush
- Importing to ZBrush – applying the texture
- Cleaning the geometry
- Retopo
- UV mapping
- Projection
- Exporting – color, normal and height
- Importing and Setting maps in Daz Studio
- Improving the texturing with Substance Designer and Substance Painter
About the presenter : John Haverkamp
John Haverkamp was born in Ohio and then moved to the pristine Blue Ridge Mountains of Virginia at a young age. There he spent a semi-isolated childhood re-enacting the Lord of the Rings and being corrupted by Dungeons and Dragons. Always with the fondness for the fantastical and medieval, Art school drove him deeper into Luddite territory by granting him the skills of a traditional metal-smith. This meant post-college jobs making copper fountains, welding and steel fabricating, casting and finishing bronze sculptures, and working for an architectural blacksmith throughout his twenties.
Digitally, John got sucked into cyberspace and the arcane mysteries of 3D Studio Max. The perfect software match for John was Zbrush discovered six years ago. Now he teaches digital arts part time, and constantly endeavours to improve his craft as a digital-sculptor and visualizer through personal work, illustration and indie game projects.
What's Included and Features
- Photogrammetry : Creating Daz Studio Assets from Photos:
- 1 x Main Tutorial video : 1 hour 45 minutes
- 3 x Supplemental videos : 40 minutes on how to improve the textures of the asset
- 1 x PDF step by step guide
- Main Tutorial:
- 00:01 - Introduction
- 00:07 - The texturing node and the parameters
- 00:12 - ZBrush
- 00:13 - Import 3D mesh
- 00:15 - Import the texture into ZBrush
- 00:17 - Questions on photography. Best photos to take
- 00:25 - Question on flash photography
- 00:29 - Hide/subtract topology. Chop into manageable parts. Trim brushes - create a clean high resolution mesh
- 00:31 - Getting a lower resolution mesh for the target application
- 00:47 - Daz Studio Iray
- 00:52 - Decimated mesh - without texture
- 00:53 - ZRemresher
- 00:54 - Recommendations on which method to reduce mesh resolution
- 00:58 - UV Master Plugin
- 01:01 - Set up for re-topo
- 01:07 - About the retopo
- 01:10 - Creating the retopo quads
- 01:14 - How to delete points and move points around
- 01:21 - Lazy retoplogy
- 01:26 - Append original rock and project
- 01:35 - Projection master
- Supplement 1 : 10 minutes (Substance Designer)
- Color polypaint in ZBrush
- Export texture to Substance Designer
- Substance Designer
- Building a new graph in Substance designer based on the texture map
- Reviewing the nodes and tweaking the default
- Change the outputs to 4K
- What to bake in Substance Designer
- Supplement 2 : 5 minutes (Substance Designer)
- Import the OBJ model
- Select elements to bake
- High definition meshes
- Bake the elements
- Re-export the maps for Substance Painter
- Supplement 3 : 24 minutes (Substance Painter)
- Improve the texturing in Substance Painter
- How to deal with poor definition areas of texture
- Using native materials in Substance Painter and a smart mask to give extra texture options.
- The dirt dry smart mask
- Applying a moss smart mask
- Trying the red rock material
Compatible Software:
Install Types:
Install Manager, Manual Install
