If you're a artist that needs to tease 2D artwork from your 3D scene, than this tutorial of the Daz Studio plugin Line Render 9000 is for you! Over 5 hours of content BY THE CREATOR of Line Render 9000, it is a must watch tutorial.
Liner Render 9000 is an incredibly powerful and flexible tool for creating Line Art from a 3D scene. It uses a unique setting called ColorID that is a non-destructive parameter that is used to assign particular colors to the materials in the scene in order for the application to understand where lines should be drawn.
Because it is and ADDITIONAL parameter, it means that you can render the scene for 2D and then turn around and re-render the scene for 3D results without changing the material parameters.
There are six cameras that come standard with LR9K
- Main Camera
- Toon 2-Tone Camera
- Toon Camera
- Fresnel Reflected V Camera
- Edge Blend Camera
- Shadow Opacity Camera
Each of these cameras looks at the model and it's underlying geometry in a slightly different way in order to decipher where to draw the lines and each of these six cameras will create two renders. The first based on what it interprets based on your settings and the second, the lines, based on the first. So in effect, the artist has 12 different layers in one render to combine in limitless possibilities and you can always add more cameras.
When you're trying to decide what setting to tweak for a camera, multiple passes of the same camera may be added to the scene and the settings all different for each camera giving the artist incredible power over zoning in on the right settings for the scene. It is not a tweak/render/look product, however that's how this tutorial is presented in order to give the customer a clear understanding of what's going on.
These tutorials total have over 5 hours of content and are available individually or as a bundle AND as a bonus, Jonathan has provided three new scripts to automatically assign the color IDs so the laborious manual part of it has been removed!
Session 1 Part 1 (52 minutes) Setting the Stage with LR9K we take a hard model, in this case Futuristic Laboratory, and run through the various setting of LR9K. At each stage, LR9K Creator Jonathan clearly explains what the cameras are doing and how to tweak them. It keeps the process simple and clear.
Session 1 Part 2 (53 minutes) Refining the Lines we stick with the Futuristic Laboratory and continue demonstrating how you can refine the lines, even to the point of bringing out details that aren't clearly visible in a 3D render. This two parts of Session 1 is intended to give the artist a solid grounding in how Jonathan intended LR9K to work and how best to use it's incredible strengths.
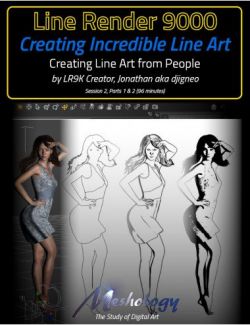
Session 2 Part 1 (47 minutes)… Line Art from People. We switch to a character here, in this case Victoria 7 to demonstrate what LR9K can do without making any modifications to the transparency maps of the hair… the nemesis of any applications trying to determine where the hair is and where it is not and LR9K performs spectacularly!
Session 2 Part 2 (49 minutes) Teasing out the Hair and Shadows, is just that. Sticking with our Victoria 7 Jonathan demonstrates how simple it is to create a simplified transparency map for the hair and add it to the character. Once done, the lines become much more clear. He also demonstrates how to add lights to your scene and start using the Shadow Opacity Camera to create stunning shadows. Once this technique is understood, every artist will be able to take advantage of shadows to set the mood in their comics or graphic novels!
As a bonus to this part, we've also included how Jonathan demonstrated on a hard model, in this case a boxing ring, how to use shadows to create mood as well as bring out details that until now, had remained hidden.
Session 3 Part 1 (48 minutes) Adding Colour to Our World. Sticking with Victoria 7, Jonathan now demonstrates, using the Toon Camera and the Toon 2-Tone Camera, how to get color your artwork as if it were cell shaded. Here the strengths of LR9K become very apparent, and you could still render in 3D. The only change to your character up to this point is hair transparency map which is easy enough to change back. Also, although not demonstrated, LR9K is perfect for creating a cell-style animation using 3D characters and sets.
Session 3 Part 2 (56 minutes) It's All in the Details delves into creating a truly cell-shaded toon. At this point texture maps are edited and the ability to render 3D scenes is not longer as easy as clicking the render button. But, every artist knows that the changes could be saved out so, all is not lost. Jonathan demonstrates how to use geoshells to add a beauty mark to the skin, although it could be anything on the skin… tattoo, scratch, etc.
As you've come to expect from Meshology, All the Tutorials are Closed Captioned in English as well as indexed so that the user can easily jump from topic to topic as they work their way through the processes. You're also provided with a PDF file with time code for reference of the videos. This document also includes additional information for quick reference such as how to load the bonus ColorID Scripts.
For a quick (and we mean really, really, quick overview of this tutorial, have a look at our Product Teaser…
About the Presenter - Jonathan (aka djigneo)
Jonathan is the creator of LineRender9000. At ardent 3D artist, he was looking for a way to create good 2D lines from Daz's 3D scenes. Unhappy with the solutions he found, he put his background as a software engineer and technical consultant by day to good use and continues to conduct experiments on Daz scripts and 3Delight rendering.
What's Included and Features
- Session 3 Part 1 : Adding Color to Our World (48 minutes)
- Intro
- Reviewing the Line Layers So Far
- Details of the Shadow Opacity Cam
- Increasing the Shadow Size
- Changing Shadows with Lighting
- How to Create a Toon Style Scene
- Experimenting with the Toon 2-Tone Camera
- How the Toon 2-Tone Camera Works
- Understanding the Toon 2-Tone Camera
- Properties of the Toon 2-Tone Camera
- The Toon Camera
- Clamps and Clamp Blending
- Toon Camera Output
- What do Clamp Values Do?
- More About the Toon 2-Tone Camera
- The Toon 2-Tone Camera and the Toon Camera are Similar, but they are Different
- The Auto Renderscript and the Parameter Relations
- Multiple Cameras with Different Properties for Each in the Same Render
- Toon Camera without Lights
- How Lighting Effects the Scene Render
- Session 3 Part 2 : It's All in the Details (56 minutes)
- Intro
- Creating a More Cartoony Look
- This is the Turning Point for Creating a Cartoon Scene Only.
- How We Use the Materials
- Selecting All the Surfaces
- Loading DZDefault
- Editing the Materials
- The Hair Materials
- How to Interpret the Camera Passes
- The Strength of Multiple Cameras
- Changing the Lighting Model
- Finding the Dress Texture
- Tweaking the Hair
- Fixing the Skin Tone
- Changing the Skin Tone
- Fixing the Eyes
- Other Detail Considerations
- Creating Character Effects
- Using a Geoshell for Skin Modifications
- Finding the Right Material
- Creating and Opacity Map
- Drawing a Beauty Mark
- Multiple GeoShells on the Same Object
- Skin Highlights are Possible
- Bonus ColorID Scripts are included.
- Bonus checklist of how to adjust materials to get cartoony colors without having to refer back to the video. Look for this at the end of the PDF Index
- This tutorial is professionally edited and indexed for random access.
- This tutorial includes a PDF index with time code references for the User's own notes.
Compatible Software:
DAZ Studio 4.12
Required Products:
Install Types:
Install Manager Manual Install