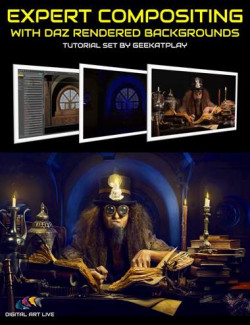
This tutorial set by Vladimir Chopine from GeekAtPlay shows how to set up your own cyberpunk lighting environment in Daz Studio without having to rely on a pre-built set and using less resources for creating the scene and rendering.
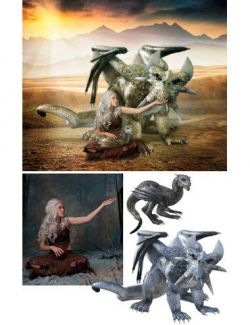
Vladimir also goes over a composites cyberpunk project in-depth using a Daz Studio rendered background and photographed model, showing how to do this step by step in Photoshop.
Total tutorial set running time: 1 hour 52 minutes
How to Set up a Cyberpunk Lighting Set in Daz Studio
How to make use of a flat plane background
How to match a 3D model on the horizon line of the background
Benefits of using a steampunk environment map (included in product)
Best way to create steampunk neon lighting
Learning lighting set up both for establishing and portrait shots in the scene
Camera settings for depth of field
Recommended emission settings for a cyberpunk environment
Recommended luminosity levels
Best practice for bloom effects
Resource pack includes 15 high-resolution cyberpunk backgrounds and a cyberpunk light dome.
Cyberpunk Composite Project in Photoshop
Compositing a photographed model onto a Daz rendered background
How to deal with translucent materials when compositing
How to tidy up the original photographed model
The advantages of smart objects in Photoshop for compositing
The importance of color temperatures
Expert masking advice
Step by step shadowing and highlights for the photographed subject
Adding shadows on the model for grounding them into the Daz rendered environment
Reflections
Matching blacks of the elements
Casting environmental colored lighting onto the photographed subject
Resource pack includes PSD file of photographed model, Cyber-alley Stonemason set render, and rendered drone asset to allow follow-on with this tutorial.
Sample Video
Presenter: Vladimir Chopine
The founder of Geekatplay and with a background in film production and computer sciences, 3D graphics have long provided a passionate pursuit for Vladimir, with a particular specialism in VUE. Serving 3D digital artists across the world, he has created over 2000 tutorials on VUE, Daz Studio, The PlantFactory, Photoshop, Terragen, World Machine, and a whole range of digital art software.
Originally from Moscow, he lives with his wife Ami Chopin, who is a professional writer in Salt Lake City, Utah.
What's Included and Features
- Tutorial Set for Creating Cyberpunk Lighting Environments in DAZ Studio
- Total Running Time: 1 hour and 52 minutes.
- Video 1 : Cyberpunk Lighting in DAZ Studio : 30 minutes (.MP4)
- 00:00 introduction
- 00:00 Select character for the set : Alia Lvl 4 G8 female
- 00:02 Add materials to the character and select a pose
- 00:03 Set up a Cyberpunk backdrop (pack included in product)
- 00:04 Set up horizon line to match backdrop.
- 00:05 Create another camera allowing for a portrait shot
- 00:06 Thinking about global and local lighting for the scene, including neon tube lighting
- 00:07 Looking at render settings: environmental map - more suited for Steam Punk (light dome included in product)
- 00:08 Result of new map
- 00:09 Best way to create neon lighting revealed
- 00:10 Setting appropriate emission colour for Steampunk lighting
- 00:11 Setting recommended luminance level
- 00:12 Review lighting in preview and reset environmental intensity
- 00:13 Adjust for some rim lighting
- 00:14 Point lighting vs surface lighting
- 00:14 Ground reflectivity
- 00:15 Consider the portrait shot and set up a better depth of field
- 00:16 Select options for lens, blades, camera properties of the portrait camera
- 00:17 Working out best depth of field and setting F:Stop on camera
- 00:19 Check the result and adjust F:Stop
- 00:20 Add a cuboid into the scene behind the actor
- 00:21 Add same background image to the cuboid
- 00:22 Adjust geometry : offset of image on the cuboid / tiling
- 00:23 Blurred background works better
- 00:24 Add emission map to the cuboid
- 00:25 Recommended luminosity level for the emission map
- 00:26 Work more on the environmental lighting
- 00:27 Ensure level of blacks/whites on floor surface matches levels on background
- 00:28 Set bloom filter properties
- 00:29 What makes for a good bloom effect
- 00:30 Bloom effect reviewed and conclusion
- Total File size: 384 MB
- Video 2 : Cyberpunk composite project: 1 hour 22 minutes (.MP4)
- 00:00 introduction
- 00:00 Challenges with this composites project : translucent materials
- 00:03 Isolate the photographed subject
- 00:06 Why use a grey coloured background for a photographed subject
- 00:10 Retouching process for photographed model
- 00:13 Spot healing
- 00:15 Smart objects in Photoshop
- 00:18 Scaling of smart object advantages
- 00:21 Shadow and highlights for the model
- 00:23 Brighter areas and highlighting
- 00:26 Create a mask for the model
- 00:29 First go at placing model on the Stonemason rendered background.
- 00:29 About colour temperatures
- 00:32 Uplight the edge of the umbrella
- 00:35 Add beginning transparencies to umbrella through to the background.
- 00:38 Umbrella mask and blur
- 00:42 Composition of the model
- 00:45 Micro expressions
- 00:47 Shadows around the feet and colour matching
- 00:50 Reflections on the umbrella from the environment
- 00:53 Looking at levels
- 00:57 Non-destructive using layers : Eyeballing shadows
- 00:59 Adjusting blacks of subject/background to match
- 01:03 New layer : casting lights on subject
- 01:06 Casting light colours matching from the background
- 01:09 Soft light and colouring
- 01:12 Smoke layer
- 01:16 Add glow with a gaussian blur method
- 01:19 Finish with final colour adjustments
- Total File size: 847 MB
- Cyberpunk Assets Pack: (.PNG and .HDR)
- 15 high resolution PNG Cyberpunk backgrounds (9216 x 6144)
- Light-dome.HDR and Light-dome.PNG
- Composites Project Pack
- PSD file of photographed model
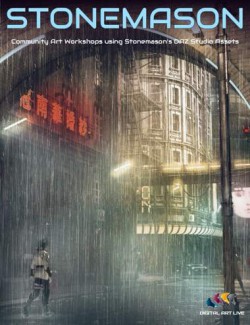
- Cyberpunk cyber-alley background render (Stonemason set) (TIF)
- Rendered drone asset (.PNG)
Install Types:
DazCentral, Daz Connect, DIM, Manual Install